In this project, we will take a quick look at the STM32F103C8T6 Development Board, which is based on an ARM Cortex-M3 Microcontroller from STMicroelectronics. I will show you some important features of this board, how to configure your existing Arduino environment to work with this board and also write the first program, which is nothing but, yes, you guessed it, a Blinky. So, let’s get started.
Introduction
In the past decade, Arduino has been the go-to board for quick prototyping, hobby projects or as a beginner’s development board to jumpstart their electronics career. But we all know the limitations of an Arduino board (let us make the discussion about Arduino UNO as it is the most popular Arduino out there) i.e. it is slow, running only at 16 MHz, has very limited internal hardware and doesn’t have enough processing power or RAM and Flash to run a FreeRTOS based application (technically, you can run FreeRTOS on Arduino but it is not ideal).
An alternative to Arduino is the STM32F103C8T6 microcontroller-based development board, which is often called as the Blue Pill (Matrix reference). This microcontroller is based on ARM Cortex-M3 Architecture manufactured by STMicroelectronics.
STM32F103C8T6 is a very powerful Microcontroller and with its 32-bit CPU, it can easily beat Arduino UNO in performance. As an added bonus, you can easily program this board using your Arduino IDE (although with some tweaks and additional programmer i.e. USB to U(S)ART converter).
A Brief Note on STM32F103C8T6 Development Board
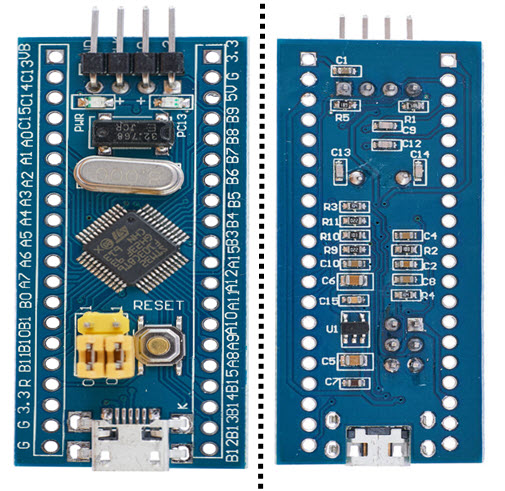
The following image shows the front and back sides of a typical STM32 Blue Pill Board. As you can see, the layout of the board is very simple and some might even confuse it for an Arduino Nano.
An important thing about these boards is that they are very cheap, cheaper than the cloned version of Arduino UNO. I got this board for approximately $2.5 (₹180) in my local electronics store. So, it is obviously a cloned version (probably a counterfeit STM32 MCU?) and there are many cloned versions of the board available in the market.
Coming to the Blue Pill board itself, you get the board and two male header strips for you to solder on to the board (shame that they don’t came pre-soldered).
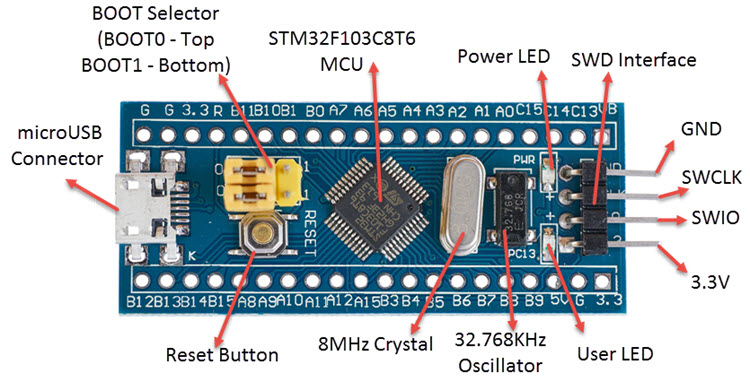
The other features of the board are as follows:
- It contains the main MCU – the STM32F103C8T6 in a Quad Flat Package.
- A Reset Switch – to reset the Microcontroller.
- microUSB port – for serial communication and power.
- BOOT Selector Jumpers – BOOT0 and BOOT1 jumpers for selecting the booting memory.
- Two LEDs – User LED and Power LED.
- 8 MHz Crystal – Main Clock for MCU.
- 32.768KHz Oscillator – RTC Clock.
- SWD Interface – for programming and debugging using ST-Link.
- 3.3V regulator (on the bottom) – converts 5V to 3.3V for powering the MCU.
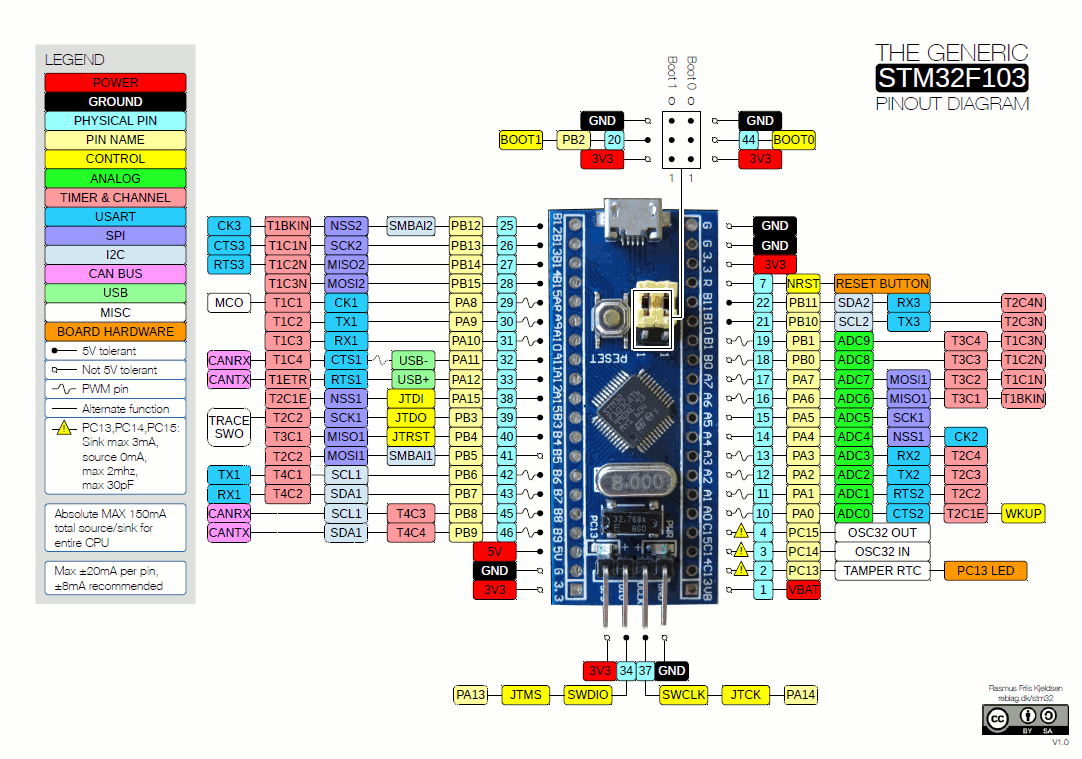
On either long edge of the board, there are pins for connecting various Analog and Digital IO and Power related stuff. The following image shows the pin configuration of the board along with different functions supported by each pin.
As you can from the above image, each pin of the STM32F103C8T6 MCU can have multiple functions (but only one has to be selected). Also, note that some IO pins are 5V tolerant, which means that you can connect 5V compatible IO on those pins without any worry.
Issues with STM32 Blue Pill Board
If you are planning to buy the cheaper version (which probably most of us will), then there are some known issues with the boards that you have to be aware of. I have taken these issues from various forums and faced some problems (USB related) myself.
- The first main issue is the 3.3V regulator. Though some boards have used genuine LM1117 3.3V regulators from TI, most of the cheap development board are found with small, knock-off regulators from an unknown manufacturer. These regulators do not have any thermal protection and are easily damaged. The solution is to use an external regulated power supply, if you have the option.
- The next two issues are related to the USB. First, the soldering quality of the microUSB port is very poor and if you frequently remove and insert the cable into this port, then there is a high chance that the microUSB connector will come off the board. You can use hot glue to cover the connector.
- The other issue related to USB is the usage of wrong pull-up resistor. According to the reference manual of the MCU, the USB D+ (named USBDP) must be pulled high to 3.3V using a 1.5KΩ resistor. But as per the schematics of several Blue Pill boards, all those are using a 10KΩ resistor. If you are planning to work on USB data transfer, then you might not get accurate results. If you are in desperate need for a solution, then you can solder a 1.8KΩ resistor is parallel to the existing 10KΩ resistor. For this, connect the 1.8KΩ resistor between pins A12 and 3.3V pin.
- Other known issues are very hard to press reset button, analog power is connected to digital power, no Schottky Diode protection for USB, etc.
Highlights of STM32F103C8T6 MCU
Now that we have seen a little bit about the Blue Pill Board, let us now understand some important features of the heart of the board i.e. the STM32F103C8T6 Microcontroller. As mentioned earlier, this MCU contain an ARM 32-bit Cortex – M3 CPU core with a maximum frequency of 72 MHz.
Let us now see some specifications of this MCU implemented in the Blue pill board.
- Memories: contains 64 Kbytes of Flash and 20 Kbytes of SRAM
- GPIO Pins – 32 with external interrupt capability
- Timers – 3 16-bit Timers, 1 16-bit PWM Timer
- PWM Pins – 15
- Analog – 10 Channels of 12-bit ADC
- I2C – 2 I2C Peripherals
- USART – 3 USART Peripherals with hardware control
- SPI – 2 SPI Peripherals
- Other Peripherals – USB 2.0 Full Speed, CAN 2.0B
These are some of the highlights and if you want to know more details about the peripherals, then you have to refer to the data sheet and the reference manual (highly recommended).
As a bonus topic, let me tell you the naming convention used in STM32 MCUs with the example of STM32F103C8T6. Each letter in the name of the MCU signifies a special characteristic.
STM —- 32 —- F F: Mainstream, L: Low power, H: High Performance, W: Wireless 1 0: M0, 1: M3, 2: M3, 3: M4, 4: M4, 7: M7 03 Details about speed, peripherals, Silicon Process, etc. C F: 20, G: 28, K: 32, T: 36, S: 44, C: 48, R: 64,66, V: 100, Z: 144, I: 176 8 4: 16, 6: 32, 8: 64, B: 128, C: 256, D: 384, E: 512, F: 768, G: 1024, H: 1536, I: 2048 KB T P: TSOOP, H: BGA, U: VFQFPN, T: LQFP, Y: WLCSP 6 6: -40°C to 85°C, 7: -40°C to 105°C
Character(s)
Significance
Possible Values
Manufacturer (STMicroelectronics)
32-bit MCU
Type of MCU
ARM Core Type
Line of MCU
No. of Pins
Flash Size
Package
Temperature Range
How to Use the BOOT Pins?
As mentioned earlier, the BOOT0 and BOOT1 pins of the MCU are used to select the memory from which it boots. The following image shows three different options of boot spaces based on these pins.
When both BOOT0 and BOOT1 pins are LOW, then the internal Flash Memory acts as the main boot space and when BOOT0 is HIGH and BOOT1 is LOW, the System Memory acts as the main boot space. These two options are important for us.
To upload the code to the Flash Memory of the MCU, you have to select System Memory as the main boot space. The reason for this is that the System Memory contains the embedded bootloader, which is programmed during the production itself by STMicroelectronics.
By booting into the System Memory i.e. the bootloader ROM, you can reprogram the Flash Memory with your application using USART1 Serial Interface.
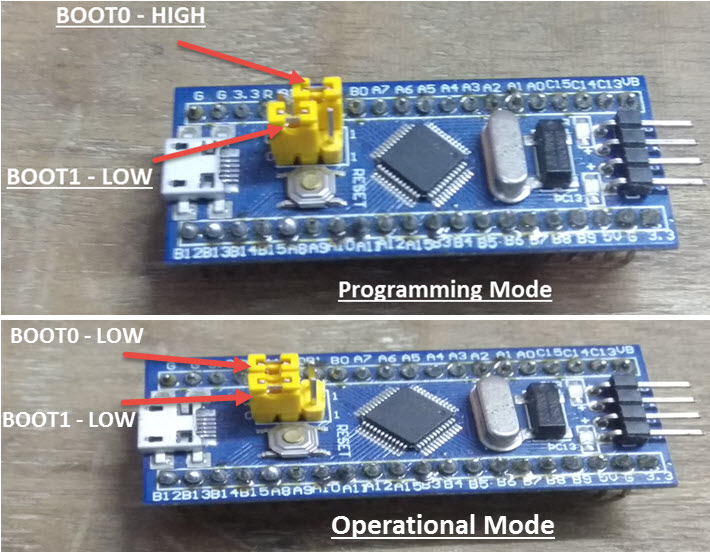
Once the program is uploaded to the Flash Memory, you can switch back the BOOT0 to LOW, so that from next reset or power-up onwards, the MCU will boot from the Flash Memory. If you notice, in both the cases i.e. selecting Flash Memory and selecting System Memory as boot spaces, the BOOT1 pin is LOW. Only the BOOT0 is toggled between LOW (Flash Memory) and HIGH (System Memory).
For the sake of convenience, let us call these BOOT selections as Programming Mode and Operational Mode. For Programming Mode, the BOOT0 pin is made HIGH and for Operational Mode, the BOOT0 pin is made LOW (default). In both the modes, the BOOT1 pin stays LOW.
Hardware Requirements for the Project
Since this is our introduction part and all we will be doing is Blink an LED (which is already present on the board), we don’t need much hardware with respect to the project and the MCU.
But for programming the Microcontroller, we need a USB to Serial Converter Module, like an FTDI board (or anything similar). As mentioned in the BOOT Pins section, the bootloader can be accessed using USART1 pins of the Microcontroller to program the Flash Memory. And for the MCU to communicate with the USART1, we need a USB to Serial Converter.
So, the final list of components required are:
- STM32F103C8T6 based STM32 Blue Pill Development Board
- USB to Serial Converter Module (FTDI Programmer, for example)
- Connecting wires
- PC or Laptop with Windows OS and Internet connectivity
NOTE: I don’t have an FTDI style programmer but have an older style USB to Serial Converter. You can use any USB to Serial Converter modules as long it has VCC (5V), GND, RX and TX pins.
Connections
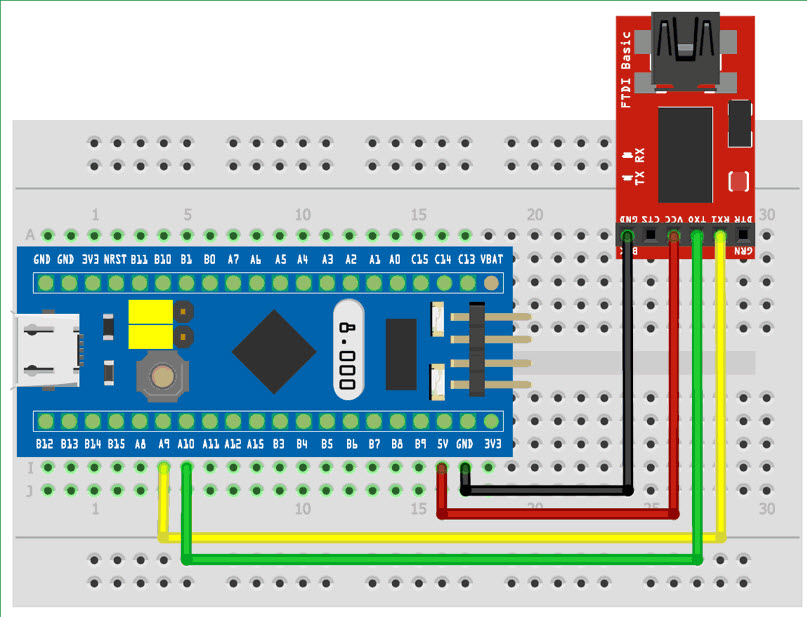
For the purpose of easy representation, I am using an FTDI like USB to Serial Converter in Fritzing Software to show the connections.
The connections should be as follows:
STM32 Blue Pill – FTDI Programmer
5V – VCC
GND – GND
A9 – RX
A10 – TX
Configuring Arduino IDE to Program STM32F103C8T6 Blue Pill
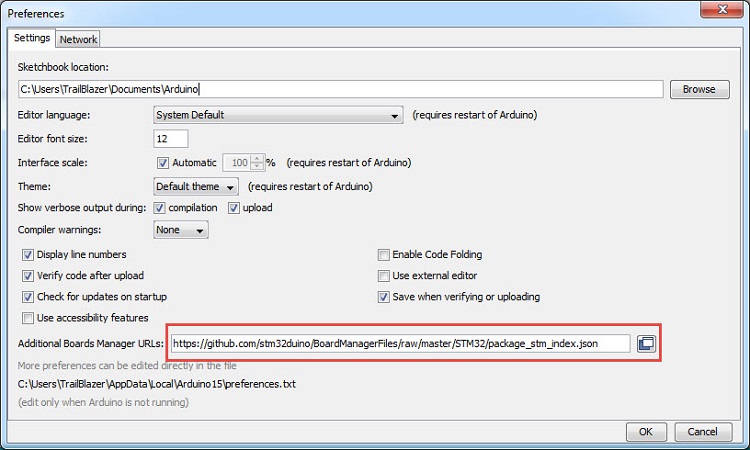
I am sure you already have Arduino IDE installed on your PC (or Laptop). If not, then install it first. After than open your Arduino IDE and select File -> Preferences. You will find a tab called “Additional Boards Manager URLs”. Copy the following link and paste it there.
” https://github.com/stm32duino/BoardManagerFiles/raw/master/STM32/package_stm_index.json “
If you already have some URLs in this section, you can add more by separating them with comma. If you have worked with ESP8266 Boards, then you might be familiar with this process already. After adding the URL, click on OK.
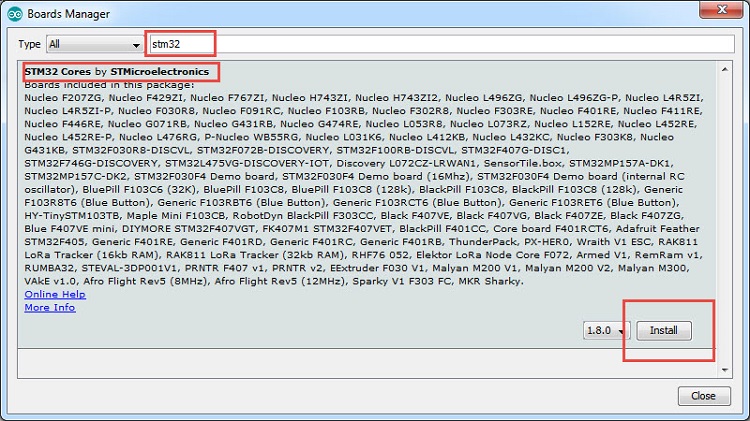
Now, go to Tools -> Board -> Board Manager… option and search for “stm32”. You will get a result like “STM32 Cores by STMicroelectronics”. Install the latest version. At the time of preparing this tutorial, the latest version is 1.8.0.
This will take some time as it will download and install some of the necessary files and tools. (I said some because, you have to download another tool from STMicroelectronics for this to work).
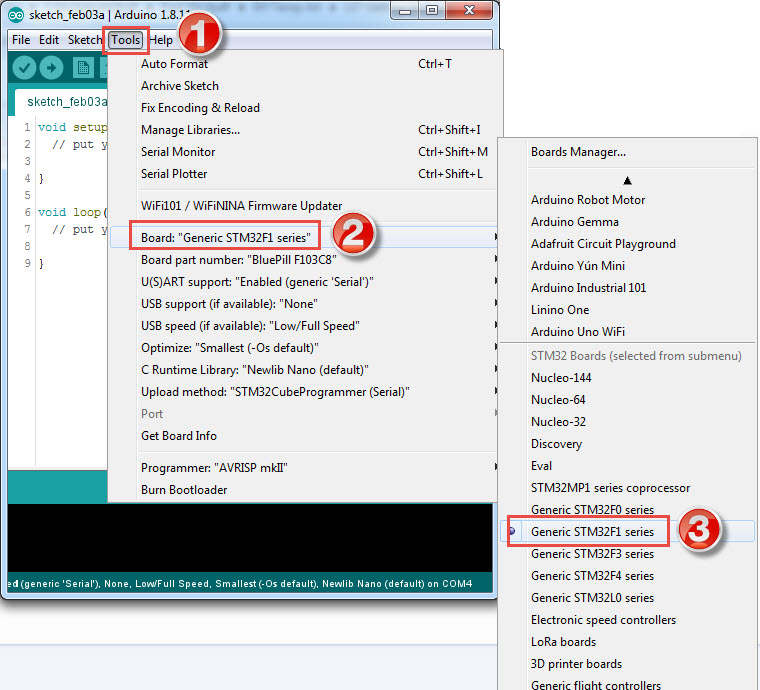
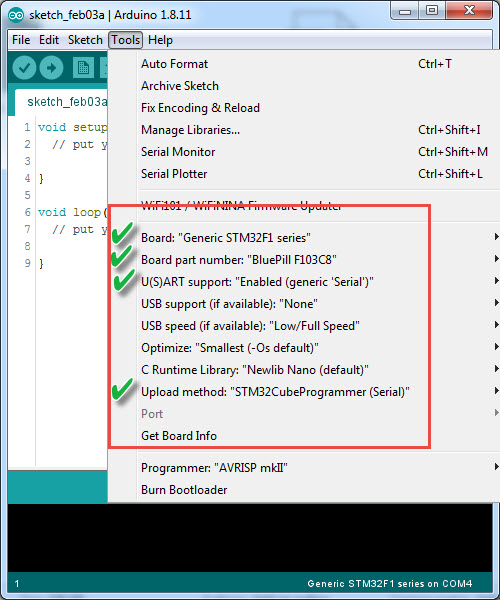
Now you can select the board from Tools -> Board -> Generic STM32F1 series. Once you select this board, a bunch of options will appear below for customizing your board type. The first important option is “Board part number”. Make sure that “BluePill F103C8” is selected.
The other important options are “U(S)ART support”, make it as “Enabled (generic ‘Serial’)” and “Upload method”, make its as “STM32CubeProgrammer (Serial)”. You can leave the remaining options as their default values.
Downloading STM32CubeProgrammer
In the above step, we have selected “STM32CubeProgrammer (Serial)” as the upload method but the problem is this tool is not downloaded and installed by the Boards Manager. So, we have to manually install it. For that, go to the official STM32CubeProgrammer download page provided by STMicroelectronics using the following link.
Click on Get Software option and it will take you Login/Register page. I suggest you to register with STMicroelectronics with a valid e-mail ID. Once you register, you can login and download the software.
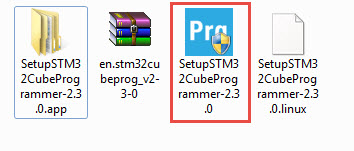
A large zip file (approximately 164 MB for version 2.3.0) will be downloaded. Extract the zip file and you will get a Windows exe file with name “SetupSTM32CubeProgrammer-2.3.0”. Double click and proceed with installation.
Make sure that the installation directory is default and don’t change anything. It might ask your permission to install some drivers for ST-Link. You can grant necessary permissions.
Once the installation is complete, make sure that in the path “C:\Program Files\STMicroelectronics\STM32Cube\STM32CubeProgrammer\bin” you have the “STM32_Programmer_CLI” exe file. If it is present, then you are good to go.
NOTE: It can be either Program Files or Program Files (x86) in the above path.
This completes the software setup for Arduino IDE to program STM32 Blue Pill. Let us proceed with writing a small program for blinking an LED and uploading it to our STM32F103C8T6 Blue Pill Board.
Blinky Program for STM32F103C8T6 Blue Pill Board
Make sure that you made the necessary changes to the Arduino IDE as mentioned in the previous section (selecting the correct board, etc.). Once that is done, make the connection between FTDI Programmer (i.e. USB to Serial Converter) and STM32 Board as mentioned before.
Now, before connecting the FTDI to the PC, make sure that STM32 Blue Pill Board is in “Programming Mode” i.e. connect the BOOT0 pin to HIGH. After that, connect the FTDI to the PC or Laptop. A COM port will be assigned to the programmer and select the same COM port in the Arduino IDE.
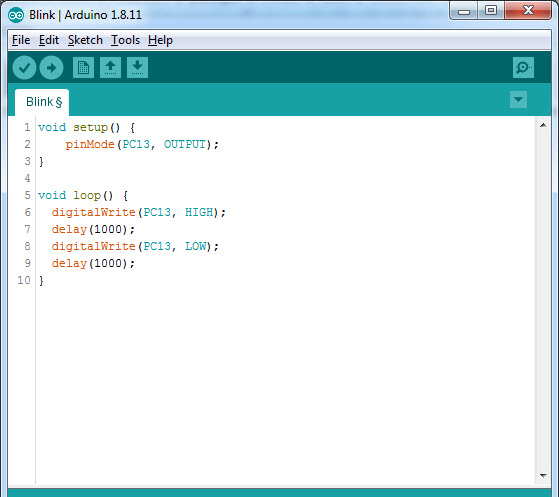
Write the Blinky program as follows. It is similar to the Arduino Blinky sketch but instead if LED_BUILTIN, I have used PC13 as the LED is connected to that pin of the MCU.
Code
void setup() {
pinMode(PC13, OUTPUT);
}
void loop() {
digitalWrite(PC13, HIGH);
delay(1000);
digitalWrite(PC13, LOW);
delay(1000);
}
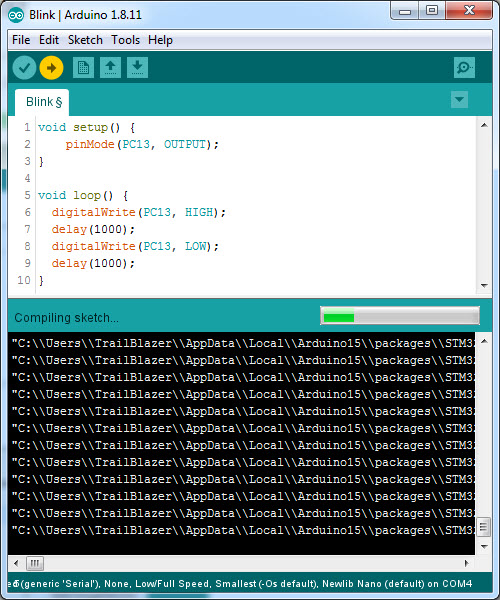
After this, you can click on Upload and the IDE will start compiling the code. It will take some time for compiling.
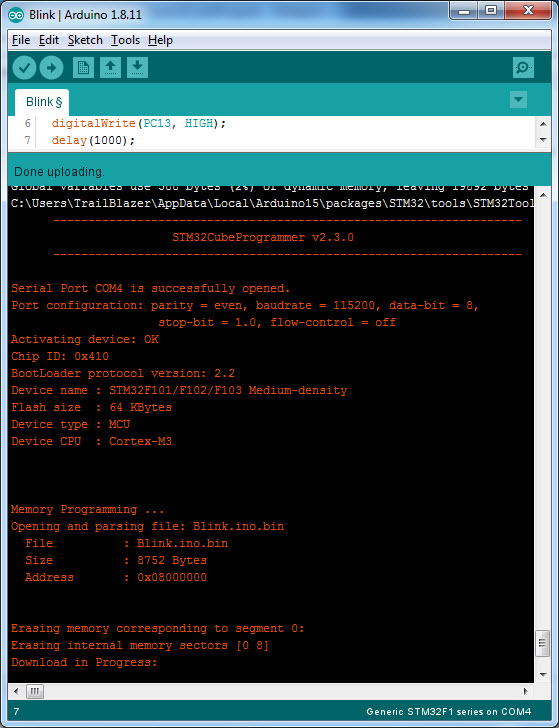
Once the compilation is successful, it will automatically invoke the STM32CubeProgrammer tool. If everything goes well, the IDE will successfully program the STM32 Board.
It will automatically reset the MCU and you can notice the LED blinking. Don’t forget to move the BOOT0 pins back to LOW position so that the next time you power-on the board, it will start running the previously uploaded program.
Conclusion
This was a lengthy tutorial on Getting Started with STM32 Blue Pill Board i.e. STM32F103C8T6. I have discussed some of the important features of the Board, highlights of the MCU, known issues of the board and how to fix them, configuring Arduino IDE, downloading necessary tools, writing our first program for STM32 on Arduino Ide and finally uploading the program and see the LED blink.
If you have any queries, questions or doubts, please comment below so that I or any other user can respond.
The post Getting Started with STM32F103C8T6 Blue Pill appeared first on Electronics Hub.



0 Comments